May 2010
As shown in , the third Wrt54g is a version 7.0 with an Atheros chipset, which cannot be used with openWRT. Other Open Source OS'es may be available, but I won't bother. We 're going to work with it as it came from the shop, with the built-in OS and GUI.
I need wireless access for laptops and guests. But I'll put them in their own network, separated from the rest of my intranet by the firewall on the router.
There are several HOWTOs describing how to turn a WRT54G into a WAP by connecting it on the LAN side only, like some TomsHardware docs, some HomeCommunity forum and some Aperture.com blog. But we are going to do things differently. We will connect the WAN port to the router, and let the Linksys do NAT...

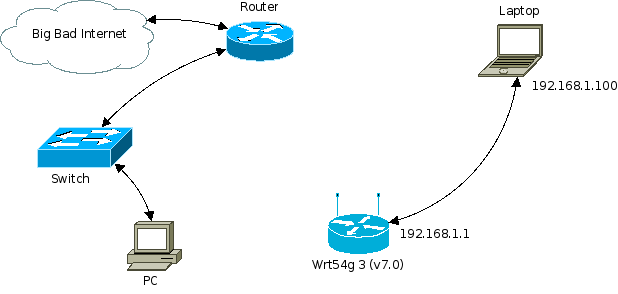
The initial situation is as shown in : the LinkSys is not the gateway.
Rather, it is attached on its WAN port to the gateway (through a switch), and to a laptop on its LAN side (directly).
The router serves DHCP to the Linksys, and the Linksys serves DHCP to the laptop and other machines behind it.
(This is necessary, as the Linksys won't relay the DHCP DISCOVER broadcast from LAN to WAN.)
We set up a static IP address on the interface that is going to be connected to the Linksys
We make sure the DHCP server listens on that interface, and we configure a shared-network in the ISC DHCPD /etc/dhcpd.conf, with inside it subnets for the logical networks on either side of the Linksys:
  shared-network wireless
  {
  subnet 10.0.137.0 netmask 255.255.255.0 {
  option broadcast-address 10.0.137.255;
  option routers 10.0.137.1;
  option domain-name "wireless";
  option domain-name-servers 10.0.137.1, <snip>

  host wrt54g3       { hardware ethernet 00:11:22:33:44:55 ; fixed-address 10.0.137.251 ; } # wrt54g v7.0
  }
  }
We make sure the BIND named listens on the interface.
Because this is an intranet nameserver, we allow it to only serve to directly connected networks.
The network behind the Linksys is not directly connected, so we need to explicitly allow requests coming from it to be served in /var/named/etc/named.conf:
  acl clients {
  localnets;
  10.0.138.0/24; # Wireless clients
  ::1;
  };
  <snip>
  options {
  <snip>
  allow-query { clients; };
  <snip>
  };
We also configure the firewall on the router to
do NAT on its 'outer' interface for the subnet on the router side of the Linksys,
also do NAT for the subnet on the laptop side of the Linksys,
not do such NAT for packets travelling between LAN-side-of-router subnets,
allow incoming traffic from the subnets on either side of the Linksys.
These rules strongly depend on the firewall used. Those given below are more or less those on my router before its upgrade, and should serve only as a general guideline...
<snip>
wirelessnet=$wireless_if:network
wirelessclientnet="10.0.138.0/24"
<snip>
# SNAT on wireless
nat on $wan_if proto tcp from $wirelessnet to any port $client_out_tcp -> ($wan_if:0)
nat on $wan_if proto udp from $wirelessnet to any port $client_out_udp -> ($wan_if:0)
nat on $wan_if proto icmp from $wirelessnet to any -> ($wan_if:0)
# SNAT for wireless clients
nat on $wan_if proto tcp from $wirelessclientnet to any port $client_out_tcp -> ($wan_if:0)
nat on $wan_if proto udp from $wirelessclientnet to any port $client_out_udp -> ($wan_if:0)
nat on $wan_if proto icmp from $wirelessclientnet to any -> ($wan_if:0)
<snip>
no nat on $wan_if from $intranet to $wirelessclientnet
no nat on $wan_if from $wirelessnet to $wirelessnet
<snip some more of these 'no nat' rules>
<snip>
# Block everything by default
block log all
<snip>
# Allow all traffic on wireless
pass in log on $wireless_if from $wirelessnet
pass in log on $wireless_if from $wirelessclientnet
pass out log on $wireless_if
Reload the DHCP daemon, the BIND daemon, and the firewall ruleset.
I got the little box second hand, and I don't know the previous owner's password, wo we'll have to reset it.
As documented at a technicallyeasy page, the reset button (at the back of the device, next to the WAN port, should be pressed for 30 seconds.
![[Note]](include/images/admon/note.png) | Note |
|---|---|
|
There are also docs that speak of 30 seconds reset while powered on, then 30 while powered off, then another powered on again. That drops us in a firmware upgrade dialog, and another brief press of the reset button will get us out of that, after which I don't see much difference with the just-once-30-seconds approach. |
We now disconnect the cable to the router from the Linksys, so it is only connected to the laptop.
Then we do a DHCP RENEW on the laptop.
y (For Linux, that's sudo dhclient eth0.)
It will receive an IP number, and the LinkSys' GUI will be available on 192.168.1.1, with username blank and passwd 'admin'.
We now have the situation as in .

![[Note]](include/images/admon/note.png) | Note |
|---|---|
|
Disconnecting the router just makes sure the router's DHCP daemon doesn't interfere iwth the Linksys (yet). It reduces confusion. |
The wireless interface of the Linksys is turned on by default, with no security whatsoever. This is necessary to make the thing work out of the box. And we only expose the laptop by leaving it on. But I turned it off anyway.
Under ->, we now set a new password, then click .
We now want access to the Linksys' GUI from the PC.
Under ->, we set to Enable and its to 80.
![[Note]](include/images/admon/note.png) | Note |
|---|---|
|
This wouldn't be very safe if the router were on the Internet with its WAN connection. But it's just connected to our router, which blocks HTTP traffic initiated from the Internet, so the danger is quite a bit smaller. |
Under ->, we set to Disable.
Press again.
Reconnect the cable between the Linksys (on the WAN port) and the router
Go to -> and press
Now we can access the GUI at http://10.0.137.251 from a browser on the PC. We do so from now on.
The Linksys cannot do DHCP for its own IP number on the LAN side, so we must configure that manually.
Using a browser on the PC, go to the -> menu (the default when the WebGUI opens), and set to 10.0.138.251.
And set the time zone if you wish.
Then
![[Warning]](include/images/admon/warning.png) | Warning |
|---|---|
|
After this step, your networks are temporarily open to access from any wireless client in the area. So I temporarily blocked traffic incoming on the router from the range behind the Linksys. But you might just finish the next step quickly and be done with it. |
Under ->, set to mixed and choose an SSID, then press .
Under ->, set to WPA2 Personal and pick a good '' password, then press .
Connect to the Linksys from the Laptop, using a wireless connection.

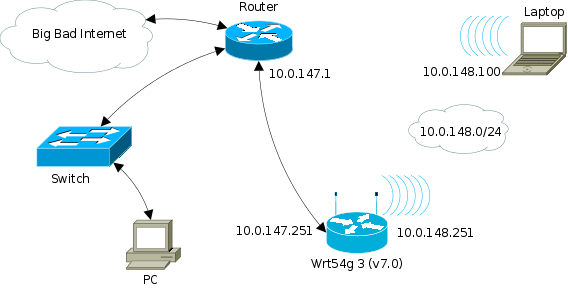
We have now gotten to the situation of .
Wireless access to the laptop is accomplished.
The situation can now be 'finetuned' further (e.g. tighten wireless access with MAC filters, add firewall rules on the router to disable access from the wireless network to the rest of the intranet, etc. etc.)